
That moment when you finally decide to upgrade your bathroom, whether it’s out of necessity or pure inspiration, there’s often one focal point that sets the stage: the vanity. But what starts as excitement can quickly become stress when measurements go askew, plumbing turns problematic, or your new fixture simply feels out of place. Getting the installation and customization right isn’t just about aesthetics; it’s the difference between a daily dose of calm and a source of constant frustration.
Why You Need the Right Bathroom Vanity: Common Challenges and What to Avoid
Choosing a bathroom vanity is more than just picking a style you like online. The wrong choice can lead to a domino effect of issues, from cramped storage to water damage. Many people underestimate just how critical it is to match the vanity to both their space and their habits, resulting in purchases that neither fit nor function well.
Identifying Space and Storage Needs
Ever tried to get ready in a space that’s smaller than your morning routine? Not all vanities fit every bathroom. Overlooking the interplay between floor area, door clearance, and plumbing can leave you with a unit that makes your bathroom feel claustrophobic. And if you share your bathroom, inadequate storage can create endless countertop clutter.
Understanding Style and Material Pitfalls
Looks matter, but so does longevity. Picking a trendy finish without checking if it handles humidity can lead to swelling, warped wood, or chipped paint. Not every material is created equal; for example, certain woods need sealing, and some composites simply can’t handle kids who splash water everywhere.
Budgeting Mistakes That Can Cost You
It’s tempting to skimp on installation or buy the cheapest option, but hidden expenses add up fast. Plumbing relocation, wall repairs, and emergency handyman calls often stem from choosing fixtures or installation shortcuts without considering the full project scope.
Choosing the Perfect Vanity for Your Bathroom
The right vanity should fit your physical space, suit your lifestyle, and enhance your daily routine. Here’s how to narrow down your options.
Measuring Your Space Accurately
Break out the measuring tape and double-check everything, width, height, depth, and even the swing of doors and drawers. Remember to factor in existing plumbing and electrical outlets, as these often dictate your choices more than you expect.
Selecting the Right Size and Configuration
Single or double sink? Floating or freestanding? Don’t just copy a magazine photo, consider your actual habits. A couple that gets ready together may need separate sinks. A powder room, in contrast, may shine with a petite floating vanity to maximize floor space.
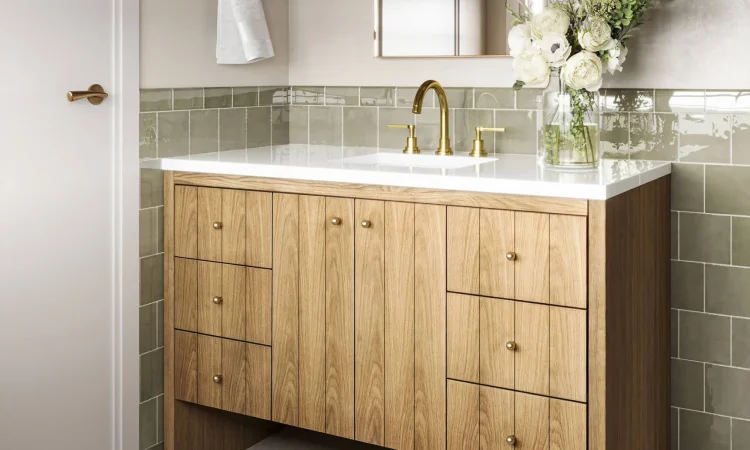
Exploring Design Styles and Finishes
Modern, rustic, or classic? Your vanity sets the tone for the bathroom. Matte finishes tend to hide fingerprints, while glossy versions reflect more light. Don’t forget hardware, brushed metals can add sophistication, while matte black exudes modern chic.
Deciding on Countertop and Sink Types
Quartz, marble, ceramic, or composite: each countertop material comes with its own pros and cons in durability, cleaning, and cost. Integrated sink–countertops are sleek and prevent water seepage, while vessel sinks make a bold statement but require careful height planning.
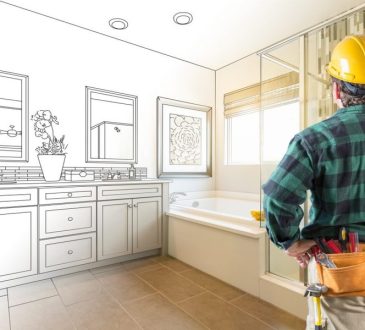
Preparing for Installation: Tools, Materials, and Safety
Preparation is the secret weapon of any successful bathroom renovation. Rushing this step leads to mistakes you’ll literally have to live with.
Essential Tools and Supplies Checklist
Before you start, gather these basics:
– Measuring tape
– Adjustable wrench
– Level
– Drill and screwdriver set
– Bucket and towels
– Silicone sealant
– Caulking gun
– Plumber’s putty
– Utility knife
– Safety gloves and goggles
How to Turn Off Water and Power Safely
Start by shutting off the water supply valves under the sink. For bathrooms with outlet or lighting changes, turn off the electricity at the circuit breaker. While it may seem obvious, skipping this can result in some truly memorable (and wet) lessons.
Removing the Old Vanity Without Damage
Clear the countertop and empty all drawers. Use a utility knife to cut any caulk sealing the vanity edges. Disconnect plumbing carefully with a bucket ready for any leftover water. Unscrew mounting brackets or fasteners, then gently pry the vanity away from the wall.
Step-by-Step Vanity Installation Process
Now for the hands-on part. With your area prepped and measurements double-checked, you’re ready to install.
Assembling Your Vanity Components
Many vanities come partially assembled, but double-check for loose doors or drawer tracks. Attach legs or mounting brackets as per the instructions. Keep all parts organized, missing screws have a way of vanishing at the worst moment.
Positioning and Securing the Vanity Cabinet
Lift the cabinet into place, aligning it with wall studs for secure anchoring. Use a level to ensure everything is perfectly straight before drilling in fasteners. For floating vanities, proper stud support is critical to avoid sagging over time.
Installing the Sink and Faucet Fixtures
Dry fit your sink and faucet to catch any alignment issues. Install the faucet and drain assembly outside the cabinet for easier access, then set the sink into the countertop with a bead of silicone sealant around the edge.
Connecting Plumbing: Drain and Water Supply Lines
Attach the water supply lines to the faucet and reconnect the drain to your existing plumbing. Use plumber’s putty and Teflon tape to prevent leaks. Tighten all connections by hand before giving a gentle wrench turn.
Leveling and Sealing for a Professional Finish
Check again with the level. Shim if necessary, especially if your bathroom floor isn’t perfectly flat. Run a bead of silicone caulk along the edges where the vanity meets the wall and floor, sealing out water for longevity and a polished look.
Customizing Your Vanity for Function and Flair
You don’t have to stop at installation. Custom touches can transform your vanity into something uniquely yours.
Adding Storage Solutions Like Drawers and Shelves
Consider drawer organizers, pull-out trays, or even a hidden hamper to tame the chaos. Floating shelves above or beside the vanity can provide extra storage for towels and toiletries.
Choosing and Installing Backsplashes and Mirrors
A backsplash not only protects your wall from splashes but also frames your vanity. Mirrors can be simple or statement-making, think LED-lit, frameless, or retro-inspired. Mount them at a height that suits everyone who’ll use the bathroom.
Installing Lighting Options to Enhance Ambiance
Layered lighting works wonders. Overhead fixtures combined with sconces or under-cabinet LEDs make the space both functional and inviting. Adjustable lighting helps set the mood, from bright mornings to relaxing soaks.
Personalizing Hardware: Handles, Knobs, and Faucets
Hardware is jewelry for your vanity. Swapping out standard handles for something bolder or choosing a faucet with a unique finish can dramatically shift the vibe. When searching for inspiration, browsing collections like Evos Boutiques bathroom fixtures can spark new ideas and help you discover fittings that complement your aesthetic.
Troubleshooting Common Installation Issues
Even careful planners hit snags. Here’s how to tackle common problems.
Fixing Uneven Floors and Wall Alignments
Many older homes have floors that aren’t perfectly level. Use shims under the vanity base to stabilize it, then trim excess with a utility knife. If the cabinet doesn’t sit flush against the wall, caulking can mask minor gaps.
Addressing Leaks and Water Pressure Problems
If you see drips after reconnecting plumbing, check all connections and replace worn washers. Low water pressure often comes from debris in the aerator, unscrew and rinse it before reinstalling.
Handling Unexpected Plumbing Challenges
Stubborn pipes or out-of-place drain lines can stall your project. Flexible supply lines and offset traps can help navigate awkward layouts. For anything beyond basic rerouting, don’t hesitate to call a licensed plumber.
Maintaining Your Bathroom Vanity for Longevity
A little care goes a long way in keeping your investment looking fresh.
Cleaning Tips for Different Materials
– Wood and veneer: Wipe with a damp cloth, avoid soaking, and use mild cleaners.
– Stone and quartz: Use pH-neutral cleaners; avoid vinegar or bleach.
– Ceramic sinks: Mild soap and water keep them spotless.
Preventing Water Damage and Mold
Wipe up spills quickly. Ensure caulk and seals remain intact, reapplying as needed. Good ventilation, like a bathroom fan, helps keep mold at bay.
When and How to Refinish or Update Your Vanity
Faded finishes or chips don’t always mean replacement. Many vanities can be sanded and repainted, and hardware swaps can refresh the look without a full remodel.
Final Touches: Styling Ideas and Expert Advice
A well-installed vanity deserves thoughtful finishing touches. Choose décor that reflects your style: a small plant, a tray for essentials, or a piece of art that brings color and character. Coordinate your vanity with towels, wall paint, and flooring for a harmonious look.
Eco-friendly upgrades, like low-flow faucets or sustainably sourced materials, are increasingly popular and can help you save on utilities while reducing your environmental footprint. If you ever feel out of your depth, especially with plumbing or electrical work, getting professional help is a smart investment that can save time, money, and stress.
A bathroom renovation is about more than function; it’s about creating a space where you start and end your day feeling calm, confident, and inspired. With these step-by-step strategies and the right resources, your new bathroom vanity will be both a pleasure to use and a point of pride for years to come.


